Saturday, April 26, 2025

Bridgecom BCR-220 configuration for AllStarLink using RA-42

This post describes the steps needed to interface a Bridgecom BCR-220 repeater to AllStarLink using the Masters Communications RA-42.

You will need to change the repeater's configuration using the Bridgecom supplied programming adapter and software.  First read and save your current configuration.

My factory configuration looks like the following:


You will need to make the following changes to your configuration for the repeater to work with an external controller.  This configuration uses the Bridgecom controller for CTCSS encode and decode.

Here are my new settings for the repeater:


Set Broadcast interval to zero and uncheck Broadcast Activity Independent.


Slot 00 is the sysop slot.  It is repurposed when using an external controller.  Set the CTCSS to the tone you want to use.  It should be the same as the setting for slot 01.  When the CTCSS tone is detected for slot 00, the COS signal is pulled low so that the external controller can operate the transmitter.


Set the courtesy tone to None.


The following setting allows you to use the repeater when the external controller is not working.  Set the CTCSS tone to another value.


You will need a DB25 male connector and a DB9 male connector for the interface cable. The cable to interface from the repeater to the RA42 should be constructed as follows:

DB-25 (BCR-220)

Notes   

 DB-9 (RA-42)

 8- Rx Discriminator Out


6 - Audio In

 17 - COS Active Low


3 - COS Input 

 19 - TX Audio In

Add series 4.7K resistor 

2 - Left Audio Output

 20 - PTT In (Active Low)


5 - PTT Output

 25 - Ground


8 - Ground

The simpleusb.conf should have deemphasis enabled and preemphasis disabled.  Carrierfrom should be set to usbinvert. My configuration looks like the following:


[usb_64837]

eeprom = 0                  ; EEPROM installed: 0,1                                         ; 0 = no (default)                                                ; 1 = yes

hdwtype = 0                 ; Leave this set to 0 for USB sound fobs modified using                                                                        ; the instructions from usbfob.pdf. Use a setting of                                                                              ; 1 is for Dingotel/Sph interfaces.

; Receiver parameters

rxboost = 0                 ; 0 = 20db attenuator inserted, 1= 20db attenuator removed                                                                    ; Set to 1 for additonal gain if using a low-level receiver output

carrierfrom = usbinvert     ; no,usb,usbinvert                                                ; no - no carrier detection at all                                ; usb - from the COR line on the USB sound fob (Active high)

                            ; usbinvert - from the inverted COR line on the USB sound fob (Active low)

ctcssfrom = no              ; no,usb,usbinvert                                                ; no - CTCSS decoding, system will be carrier squelch             ; usb - CTCSS decoding using input from USB sound fob (Active high)                                                            ; usbinvert - from the inverted CTCSS line on the USB sound fob (Active low)

deemphasis = yes            ; enable de-emphasis (input from discriminator)

plfilter = yes              ; enable PL filter

;rxondelay = 0              ; number of 20ms intervals to hold off receiver turn-on indication

; Transmitter parameters

txmixa = voice              ; Left channel output (A): no,voice                              ; no - Do not output anything                                    ; voice - output voice only

txmixb = no                 ; Right channel output (B): no,voice                              ; no - Do not output anything                                    ; voice - output voice only

txboost = 0

invertptt = 0               ; Invert PTT: 0,1                                                ; 0 - ground to transmit                                          ; 1 - open to transmit

preemphasis = 0             ; Perform standard 6db/octave pre-emphasis

; pager = no                ; no,a,b (e.g. pager = b means "put the normal repeat audio on channel A, and the pager audio on channel B")

; duplex3 = 0               ; duplex 3 gain setting (0 to disable)

duplex = 0                  ; Duplex 0,1                                                      ; 0 - half duplex                                                ; 1 - full duplex


You now need to use simpleusb-tune-menu to set the RX and TX levels.


Monday, February 24, 2025

Configuring Asterisk for Developer Mode

 So that I don't forget, you can configure asterisk for developer mode by:

./configure --enable-dev-mode

menuselect/menuselect --enable DONT_OPTIMIZE --enable BETTER_BACKTRACES --enable COMPILE_DOUBLE --enable DO_CRASH menuselect.makeopts

menuselect/menuselect --enable DEBUG_THREADS --enable MALLOC_DEBUG --enable DEBUG_FD_LEAKS menuselect.makeopts


Saturday, June 29, 2024

AllStar Version 3 Announcement

 AllStarLink is proud to announce ASL3, the next generation of AllStar repeater and hotspot software. ASL3 is built to run on Asterisk 20, the latest operating systems, and modern hardware. Asterisk 20 brings over 15 years of bug fixes, security improvements, and enhancements. Naturally, ASL3 benefits significantly from running on Asterisk 20. But we didn’t stop there.

ASL3 is easier to install and use thanks to a new fully functional Raspberry Pi image. To get started, check out the Raspberry Pi installation video at https://youtu.be/aeuj-yI8qrU 1. Debian 12 amd64, ASL3 installation is via apt updates. See the new manual at https://allstarlink.github.io.

Final but important notes: ASL3 configuration is significantly different, particularly for those who edit the configs. Both veteran and new AllStar users alike are advised to proceed with caution, read the manual, and follow the installation video.

73 and enjoy ASL3, the best AllStar yet.

Wednesday, June 26, 2024

AllStarWx 1.3 Released

 AllStarWx 1.3 has been released.  This version has these new features:

  • Supports VoiceRSS Text to Speech engine.  This service offers 350 requests per day free.  It is easier to setup than Google Text to Speech.
  • Added the script select_tts.sh to allow the user to easily select the text to speech engine. 

As with any update, I recommend that you backup your configuration in \usr\local\AllStarWx.

You will find the revised manual and installers at https://www.weathermessage.com/allstarwx.aspx.

Tuesday, June 11, 2024

USB Duplex Repeater HotSpotRadio for AllStarLink

I am testing a new full duplex hot spot for AllStarLink.  More information at https://hotspotradios.com/usb-duplex-repeater


AllStarWx Version 1.1 Released

AllStarWx 1.1 is now officially released.  This version has these new features:

  • Supports Festival and Pico TTS engines.  (They are not as good as Google TTS, but easier to setup.)
  • Ability to read the NWS headline for new products.  (You will have to modify your [NewMessage] Text entry.)
  • Ability to ready the NWS announcement headline instead of the standard headline.  This headline includes additional information.  (This requires you to modify the [NewMessage] Text entry.)
  • Ability to turn off watch and advisory products in the tail message.
  • Forecasts and Observations can now be requested through the background service.  This makes the responses more responsive.  It still takes some time to request the data and process it through the TTS engine.
  • Added the ability to call a script when new products are issued at the county level.  The script is passed the county identifier and the event type.  This script can be used to do specific things based on the associated county.
  • Upgrade the application to .NET 8.

This version has been tested on 4 different nodes.  All of the features appear to work properly.  As with any update, I recommend that you backup your configuration in \usr\local\AllStarWx.

You will find the revised manual and installers at https://www.weathermessage.com/allstarwx.aspx.

Tuesday, September 5, 2023

Connecting the Yaesu DR-2X to AllStarLink using RA-DR1X

The following connections are needed to connect a Yaesu DR-2X to a Masters Communications RA-DR1X.  The image was created by David AL5X and modified by KB4MDD for the DR-2X.


Connecting the Yaesu DR-1X to AllStarLink using RA-DR1X

The following connections are needed to connect a Yaesu DR-1X to a Masters Communications RA-DR1X.  The image was created by David AL5X.


Monday, January 9, 2023

Pi-Star - Opening additional ports

 My VHF and UHF repeaters are located at different sites.  They are connected to a host site by VPN.  Because of that, I run IRCDDBGateway at the host site that provides internet connectivity.  

When you run a split system like this, IRCDDBGateway is not enabled on each repeater.  The host site takes care of routing, etc.  

In a configuration like this you must change the firewall rules in Pi-Star.  This is accomplished by creating the file "root/ipv4.fw".  The main rules file is overwritten during updates.  This supplemental file is not changed and is automatically incorporated when updates occur.   Mine looks like the following:

iptables -A INPUT -p tcp --dport 20010:20013 -j ACCEPT
iptables -A INPUT -p udp --dport 20010:20013 -j ACCEPT
iptables -A OUTPUT -p tcp --dport 20010:20013 -j ACCEPT
iptables -A OUTPUT -p udp --dport 20010:20013 -j ACCEPT
iptables -t mangle -A POSTROUTING -p udp --dport 20010:20013 -j DSCP --set-dscp 46
iptables -t mangle -A POSTROUTING -p udp --dport 20013:20013 -j DSCP --set-dscp 46

 To create this file you run the command "rpi-rw", then create the file.  After creating this file, you need to run the command "sudo pistar-firewall", followed by "rpi-ro".  This will add these additional rules to iptables.


Tuesday, January 3, 2023

AllStarLink - Announce IP Address

The following script can be used to announce your AllStarLink's node IP address.  I needed this because my portable node connects via WIFI and the IP address changes.

Create /usr/sbin/sayip.sh and insert the following code:

#!/bin/sh

Node=54362

DONE=0

while [ $DONE -eq 0 ]

do

IPADDR=$(ip addr | grep 'state UP' -A2 | tail -n1 | awk '{print $2}' | cut -f1 -d'/')    

if [ ".$IPADDR" = "." ]

     then

echo "no ip address"

DONE=1

else

         CMD="cat "

         for x in `echo "$IPADDR" | fold -w1`; do

           if [ "$x" = "." ]

           then

           CMD=$CMD"/var/lib/asterisk/sounds/letters/dot.ulaw "

     else

           CMD=$CMD"/var/lib/asterisk/sounds/digits/$x.ulaw "

           fi

         done

`$CMD >/tmp/ip.ulaw`

        /usr/sbin/asterisk -rx "rpt playback $Node /tmp/ip" 

DONE=1

     fi

done

Change Node=54362 to your node number.

Make the file executable with the command: chmod ugo+x /usr/sbin/sayip.sh

Edit /etc/rpt.conf and add a command like the following in the [functions] stanza.

980=cmd,/usr/sbin/sayip.sh

In your node stanza, change the startupmacro so that it reads startupmacro=*980

Now when your node boots, you it will automatically announce the assigned ip address.

Note:  This code is based on the sayip.sh script included with ASL-Asterisk.


Portable UHF Repeater for AllStarLink

 This is a portable UHF repeater for AllStarLink.


Sunday, October 30, 2022

AllStarWx

 I have been working on a new application to announce live weather alerts over AllStarLink. 

Here is an overview of the application.  You can find more detail at https://www.weathermessage.com/allstarwx.aspx

AllStarWx is a comprehensive weather alerting and reporting system for AllStar and derived systems.   It uses the National Weather Service’s alerts web service to retrieve data.  This feed is based on the CAP v1.2 specifications. 

AllStarWx supports the following features: 

  • On-demand forecasts.
  • On-demand current weather conditions.
  • Real-time weather alerts.
  • Supports one or more counties.
  • Announces new weather alerts when they arrive.
  • Polite announcements.  It will wait for the receiver to be inactive.
  • Uses Asterisk® Manager Interface (AMI) to send commands to AllStar.
  • Creates a tail message that summarizes the active weather events.
  • Tail messages can be incorporated into AllStar or played periodically.
  • Uses static sound effect wave files to draw attention to the alert.
  • Execute a script when entering weather alert mode.
  • Execute a script when new events arrive.
  • Execute a script when all events have expired.
  • Runs as a background daemon.
  • Changes to the configuration are automatically loaded.
  • Features a test mode to check your configuration.
  • Logging to review the operation of the application.

Friday, June 17, 2022

Allstar Link - Play net announcement

 This is a quick script to play a net announcement on Allstar Link.  If the repeater is busy, it will wait for 5 minutes for a break.  If there is no break - it will exit without playing.  You will need to create your custom announcement audio file using these procedures.

#!/bin/bash

stat=""

endTime=$(( $(date +%s) + 300))

while [[ $(date +%s) -lt $endTime ]]
do
        stat=$(asterisk -rx "rpt showvars 53431")


        if [[ $stat = *RPT_RXKEYED=0* ]]
        then
                break
        fi

        sleep 5
done

if [[ $stat = *RPT_RXKEYED=1* ]]
then
        exit
fi

/usr/sbin/asterisk -rx "rpt playback 53431 /root/fieldday2022"


This script checks to see if the repeater receiver is active before playing the announcement.  Replace 53812 with your node number.  The file netannounce is the recording that will be played.  It must be stored with the extension .ulaw in the directory of your choice.

Friday, April 8, 2022

Changing MTR2000 VHF 150-174mhz PA to 132-154

See this article on the Repeater Builder site for more information on making the 150-174mhz MTR2000 PA work in the ham bands. 

Here is a picture of the area where the two SMD resistors have to be changed to 15K.


These are the two SMD 1.5K resistors that should be removed.


Here is a picture with the parts removed.


This picture shows the new 15K resistors installed.  The new parts are slightly larger than the old parts.


Tuesday, September 28, 2021

MMDVMAudio

I am working on a new application to decode DMR audio on a hotspot and pipe it out the 3.5mm jack on the raspberry pi.

Here is a video of my progress.  


Wednesday, June 23, 2021

AllstarLink Dynamic DNS (DDNS)

AllstarLink internally support Dynamic DDNS.  If you have a node that does not have a static IP address, you can use their internal DDNS system to remotely access your node.

Each node registers with AllstarLink's internal registration system.  It periodically reregisters so that the AllstarLink system knows your node's IP address.  Your node number and IP address is automatically downloaded by other nodes throughout the day.  This is how other nodes know how to connect to your node.

Because of this built-in capability, Allstar link can and does provide a DDNS service.  You can access your node using xxxxx.nodes.allstarlink.org or xxxxx.remotebase.nodes.allstarlink.org.  

This URL will allow you to easily access your node using SSH or view Allmon2, provided that you have open the ports for SSH or HTTP.  There is no need to setup your own domain name through a third-party DDNS provider.

Note:  My node was setup as a remote base, so I had to use xxxxx.remotebase.nodes.allstarlink.org

You will find the documentation on their DNS system at https://wiki.allstarlink.org/wiki/DNS_Servers.

Wednesday, April 7, 2021

Hamshack Hotline RF setup

 I recently setup Hamshack Hotline to link to our 145.33 Allstar node.  I ran into a problem with the Allstar node rejecting the connection because of authentication.

Note:  If you run into a problem with the connection, run 'asterisk -rvvv' from the command line.  You will see messages should the inbound connection fail.  

I found this information useful - Asterisk IAX authentication

The instructions from Hamshack Hotline tell you to modify your iax.conf as follows:

[hhphone]
username= HH12345
type=user
context=hhphone
host=dynamic
auth=md5
secret=12345678901234567890
disallow=all
allow=ulaw
allow=g726aal2
allow=gsm
codecpriority=host
transfer=no
callerid=”HamshackHotline”

In my case, authenication failed because the stanza [hhphone] needed to match the value in username.  In this example case the username was HH12345.  I changed [hhphone] to be [HH12345].

[HH12345]
username= HH12345
type=user
context=hhphone
host=dynamic
auth=md5
secret=12345678901234567890
disallow=all
allow=ulaw
allow=g726aal2
allow=gsm
codecpriority=host
transfer=no
callerid=”HamshackHotline”

This solved the authentication problem.


Wednesday, March 24, 2021

Hamshack Hotline setup for FreePbx

Here is the setup for Hamshack Hotline using FreePbx.  I am assuming that you already have FreePbx setup with a connected phone.

Click on Connectivity and select Trunks.

Click the Add Trunk option.  In the drop down select Add IAX2 Trunk.

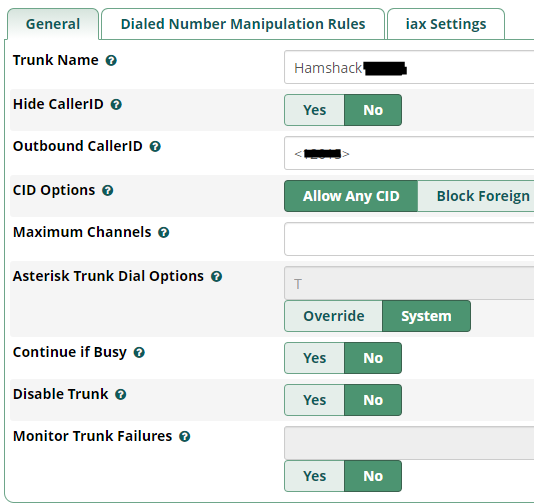
In Trunk Name enter Hamshack#### where #### is your assigned telephone number.

In Outbound Caller Id enter <#####> where ##### is your assigned telephone number.  Your screen should look like the following.


Click the iax Settings tab.

In Trunk Name enter Hamshack#### where #### is your assigned telephone number.

In the Peer Details enter the following.  Replace ##### with your assigned telephone number.  Replace xxxxxxx with your assigned secret.

host=hhus.wizworks.net
username=##### 
secret=xxxxxxxxxxxxxxxxxxxxxxxx
type=peer
qualify=yes

Your screen should look like the following.


Click the Incoming tab.

Enter your assigned telephone number in the Context field.

Enter the following in the user details.

type=user
context=from-trunk

Enter your register string as ######:xxxxxxx@hhus.wizworks.net:4569 
Replace ##### with your extension number and xxxxx with your assigned secret.  This secret is the same on the outgoing and incoming tabs.

Your screen should look like the following.


Click the Submit button.

Next you need to setup an inbound route.  Click on Connectivity then Inbound Routes.

Click add inbound route.

Enter your assigned extension number in the Description and DID fields.  In the Set Destinations box, select Extensions.  In the next drop down, select the extension that you want to receive the Hamshack Hotline calls.  Note:  You can use a ring group.

Your screen should look like the following.


.
Click the Submit button.

Now create an Outbound route.  Click on Connectivity then Outbound Routes.

Click Add Outbound Route.

Enter Hamshack##### in the Route Name.  Enter your assigned extension in the Route CID.  Select HamShack##### in the Trunk Sequence for Matched Routes.

Your screen should look like the following.


Click on the Dial Patterns tab.

Set the prefix to 7 (you can use any single digit).  Enter X. for the match pattern.

Note:  Since I have voip service with voip.ms, I am using 7 as a prefix to dial into the Hamshack Hotline server.  There are other matching options.

Your screen should look like the following.

Click the Submit Button.  Then click Apply Config at the top.

This should have you up and running on Hamshack Hotline.  I added this because I struggled to find all of the setup information in one place.  

73


Tuesday, March 23, 2021

AllStarLink Node 53431 / DMR Bridge 31018

 I have completed my AllStarLink setup to bridge the 145.33 repeater over to DMR talk group 31018.


I am using RasLink for the control software.   This software controls the GM300 which is set to 145.33.  Control is through a DMK URIX.   I also use the Repeater Builder USB-RIM-Lite.  The USB-RIM-Lite does have the ability to detect a stuck PTT.

The software allows users to link over to DMR talk group 31018 using analog_bridge from DVSwitch. You will find useful information on the DVSwitch forum.  I am using a ThumbDV for the AMBE voice conversion.  You can also use the DVstick 30.

I added a 12 volt to 5 volt converter to power the Raspberry PI.

This is a neat installation and the performance is good.

I have to thank the many amateurs that contributed open source code to make this type of project possible.